Documentation of WebRTC components within Ripple stack
Videochat flow:
- After the doctor starts the appointment videochat window is appeared and requests user camera and microphone.
- App makes ajax request to /api/user to get user info and resend it to videochat node js server by emitting user:init .
- App emits call:init event to notify server that the peer is ready for webrtc communication.
- Server responds with call:text:message:history, call:getPatientInfo and call:timer events to notify client about the text chat history, the patient info and the current duration of the videochat session.
- If the doctor and the patient is already sent call:init event then server emits call:webrtc:init event as establish webrtc command. The isInitiator field of event parameter is set to true for doctor and false for patient to differentiate who need to do webrtc offer and who need to do webrtc answer.
- After the patient joins appointment videochat window is appeared, requests user camera and micropohone and after that step 2-5 are repeated. Note that step 5 is executed only once when both opponents are join videochat.
- The doctor make webrtc offer and emit call:webrtc:message. The server always retransmits this event to call opponent.
- The patient receives webrtc offer from the doctor, make webrtc answer and emit call:webrtc:message .
- The same event is used for retransmitting ice candidates between peers.
- When videochat should be finished one opponent emit call:close event, server retransmits it to another opponent and webrtc connection stops
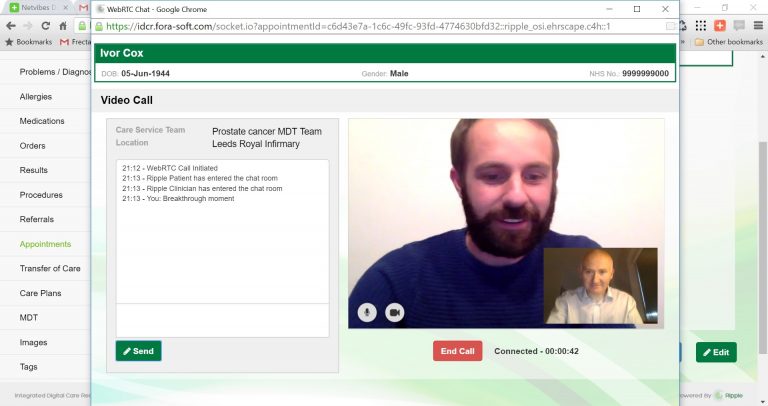
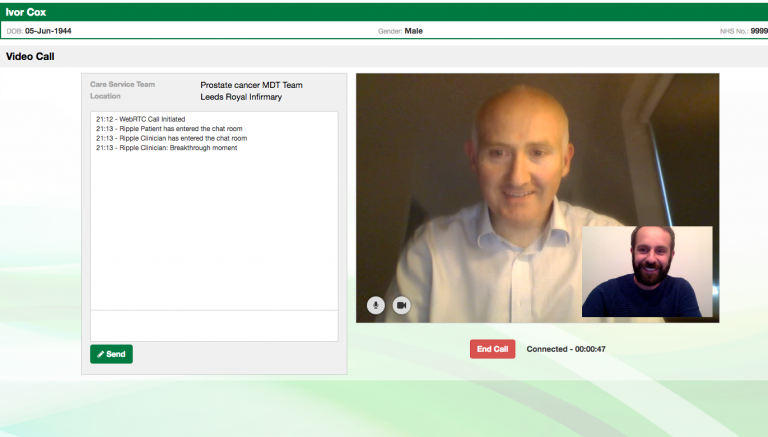
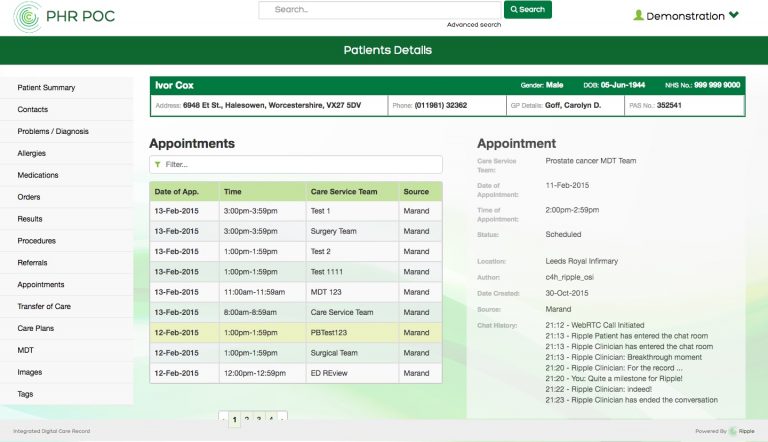
Screenshots of WebRTC Module in action
Integration instructions:
- In appointment detail component one need establish or reuse socket connection to video chat node js server.
- On component first appearing one should login on video chat node js server by emitting user:init event with such fields - userName, nhsNumber, role, name, surname. First 3 fields are critical for videochat logic, last 2 fields is used only for text chat or ui purpose.
- To retrieve appointment videochat details one need emit appointment:status event and listen to the same event to request state of appointment - closed or not yet. This event has one argument with one field - appointmentId.
- To retrieve textchat message history one should emit appointment:messages event and listen to the same event
- After login (step 2) server can send appointment:init event to the patient if there is the started videochat. Otherwise, if the patient is already on the site when the doctor started appointment then the server sends the same event in that moment. In both cases the patient client side should listen to appointment:init event. In this event server sends appointmentId.
- One need show Start Appointment button if the current user is a doctor and appointment is not closed yet (see step 3). One need show Join Appointment button if the current user is a patient, the appointment is not closed and id of the selected appointment is the same the server sent on step 5.
- When doctor clicks on Start Appointment button one need send appointment:init event to server. Server sends the same event to the patient if he is in the site or save call and send event when patient make login request (see step 2, step 5).
- After that one should show videochat window with GET parameter - appointmentId.
- When patient clicks on Join Appointment button one need show videochat window with GET parameter - appointmentId.
TURN server installation instructions on ubuntu-based machine
(based on this information)-
Installation script:
Get script here or files hereCopy, extract to a server folder and run ./setup_coturn.sh
Instructions:
- Add debian repository line deb http://ftp.us.debian.org/debian jessie main to /etc/apt/sources.list or /etc/apt/sources.list.d/coturn.list
- Add missed gpg keys for new repository by running commands:
	gpg --keyserver pgpkeys.mit.edu --recv-key 8B48AD6246925553
	gpg -a --export 8B48AD6246925553 | apt-key add -
	gpg --keyserver pgpkeys.mit.edu --recv-key 7638D0442B90D010
	gpg -a --export 7638D0442B90D010 | apt-key add -
	gpg --keyserver pgpkeys.mit.edu --recv-key CBF8D6FD518E17E1
	gpg -a --export CBF8D6FD518E17E1 | apt-key add -
- Install coturn package. Be sure that package from debian repository (version is 4.2):
apt-get update && apt-get install coturn=4.2.1.2-1
- Edit /etc/turnserver.conf and replace content by this lines:
	listening-port=3478
	realm=rippleosi.org
	server-name=rippleosi.org
	lt-cred-mech
	userdb=/etc/turnuserdb.conf
	no-stdout-log
- Add /etc/turnuserdb.conf and add user:password lines
- Edit /etc/default/coturn file to make it an automatic system service daemon. Replace TURNSERVER_ENABLED=0 to TURNSERVER_ENABLED=1
- Run turn server by command: service coturn start
To check for TURN is working:
Follow this link
To do so, add TURN server IP, username, password, click on Add server.
After that select relay option and click on Gather candidates button.
If there will be ip addresses of TURN server then it works.
Socket events on the Client Side
Socket initialization
  this.socket = io.connect(`wss://${window.location.hostname}:${8070}`);
  this.token = getCookie('JSESSIONID');
Init user, when he connected to server
  this.socket.emit('user:init', {
    username: username || sub,
    nhsNumber: nhsNumber,
    role: role,
    surname: family_name,
    name: given_name,
  });
When doctor press start appointment, he emit 'appointment:init'
this.socket.on('appointment:init', someFunction);
Send appointment messages
  this.socket.on('appointment:messages', (data) => {
    // Do something when we get data messages
    console.log('ON appointment:messages', data);
  });
Check appointment status (closed/open) from database
  this.socket.on('appointment:status', (data) => {
    // Do something when we get status from database
    console.log('ON appointment:status', data);
  });
Generate an event 'appointment:status' to find out the state appointment from database
  this.socket.emit('appointment:status', {
  	appointmentId: id, token: this.token
  });
When the call is finished and it took more than one minute an event occurs 'appointment:close' which informs the user about the termination of this session of the call
this.socket.on('appointment:close', someFunction);
Generate an event 'appointment:messages' еo learn about messages that are stored in the database
this.socket.emit('appointment:messages', { appointmentId: id, token: this.token });